¶Composite模式与Prototype模式
这两种模式都是基于 Delegation(委托) + Inheritance(继承) 而来的,
首先讲一下Composite模式,也就是组合模式,是一个经典的设计模式。
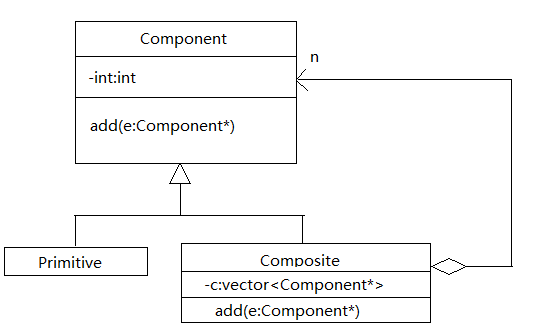
组合模式是什么?
组合模式是指将对象组合成树形结构以表示"部分-整体"的层次结构,组合模式使得用户对单个对象和组合对象的使用具有一致性。
假如我们面临一个场景,需要做一个文件类,那么我们知道,打开一个文件,文件既可以是文件夹,也可以是单体文件,为了便于识别,个体文件我们叫做Primitive,文件夹我们叫做Composite,由于文件夹里可以存放Primitive,也可以再存放Composite,形成一个递归结构,如果消耗时间去进行if-else判断显得愚钝并且效率极低,而且用户不管你如何设计,文件夹和文件如果都能当做一种东西来操作的话,是最好不过的,组合模式的目的就是让用户不再区分操作的是组合对象还是个体对象,而是以一个统一的方式来操作,实现这个目标的关键点就是设计一个抽象的基类,让它既可以代表组合对象也可以代表个体对象,这样一来,用户就不需要区分这两种对象了,只需要全部通过Compostie对象进行统一操作就行了。
(其实文件系统就是组合模型的典型应用)
伪代码实现模拟:
¶1
2
3
4
5
class Primitive:public Component
{
public:
    Primitive(int val):Component(val){}
};
1 | class Primitive:public Component |
¶1
2
3
4
5
6
7
class Component
{
    int value;
public:
    Component(int val){value = val;}
    virtual void add(Component*){}
};
1 | class Component |
1 | class Composite: public Component |
这样Composite类 通过父类指针既能接收primitive类也能接收自己。
通过下面代码就可以更加清晰看出来:
¶1
2
3
4
5
6
7
8
9
10
11
12
13
14
15
16
17
18
19
20
21
22
23
24
25
26
27
28
29
30
31
32
33
34
35
36
37
38
39
40
41
42
43
44
45
46
47
48
49
50
51
52
53
54
55
56
57
58
59
60
61
62
using namespace std;
class Component {
int value;
public:
Component() { }
virtual void add(Component*) {};
virtual void print(string path) {
cout << "";
};
};
class Composite : public Component{
string name;
vector<Component*> c;
public:
Composite(string str) :Component() { name = str; }
void add(Component* comp) {
c.push_back(comp);
}
void print(string path) {
vector<Component*>::iterator it = c.begin();
for (; it != c.end(); it++) {
Component * comp = *it;
string ss = path + "\\" + name;
comp->print(ss);
delete comp;
}
}
};
class Primitive : public Component {
string name;
int size;
public:
Primitive(string str) :Component() { name = str; }
void print(string path) {
cout << path << "\\" << name <<endl;
}
};
int main() {
cout << "创建目录中..." << endl;
Composite * rootdir = new Composite("root");
Composite * dis_o = new Composite("cdcd");
Composite * dis_s = new Composite("asda");
rootdir->add(dis_o);
rootdir->add(dis_s);
dis_o->add(new Primitive("file1"));
dis_s->add(new Primitive("file2"));
cout << "输出目录" << endl;
rootdir->print("cmd:");
cout << endl;
system("pause");
return 0;
}
1 |
|
输出结果:
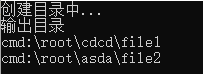
看得出来我们只需要对Composite类进行操作,就又可以存放自己,又可以存放Primitive类,这就是组合模式的便利之处了。
接下来说Prototype模式,也就是原型模式,这个模式强大之处在于它能够在你不知道你以后要设计什么类的情况下,获取一个这个类的副本,实现一系列操作。
假如我们设计了一个框架,我们不知道以后使用人员会写入什么派生类,也总不可能去用string获取类名创建,这样是不符合C++编译标准的,那么此时就要用Prototype模式了,利用使用人员写的子类自己创建自己,然后传到自己的框架基类,获取一个副本,以实现对子类对象的操作。
如下图:
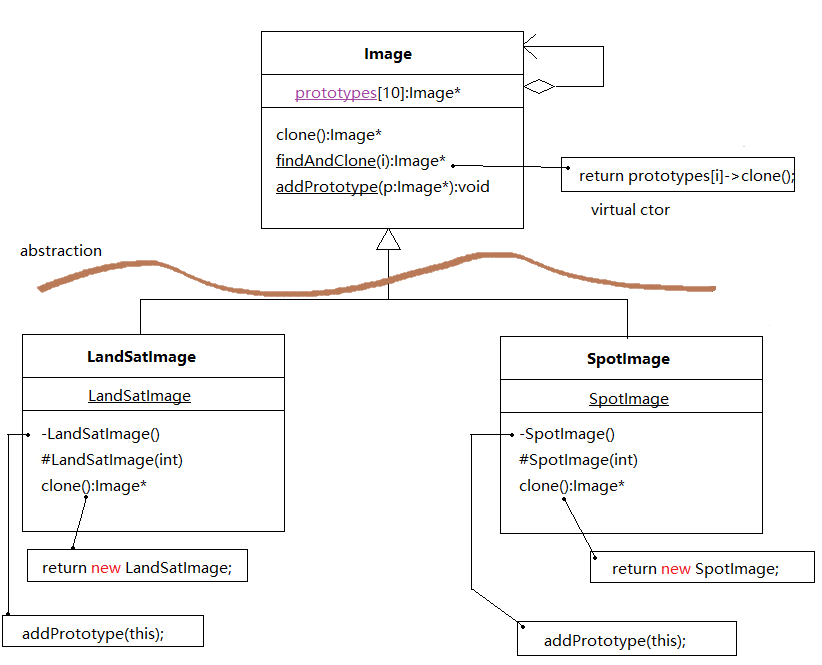
下划线代表静态变量,-是私有类型,#是保护类型
假如上面的Image类是我们自己写的,但是我们写的时候并没有LandSatImage类与SpotImage类,这些类有可能是在交付到客户手上,客户自己写的,那么我们如何去用我们自己的类来实现构造当时并不存在的类呢。
可以看到 LandSatImage类,创建了一个静态的自己,那么此时,一定会调用本身的构造函数 LandSatImage(),可以看到构造函数中有addPrototype(this); 这个是父类中的一个静态函数,作为子类是可以直接调用的,这么做是为了把自己传到父类去,传完之后那么现在就全部完成了吗?还没有,此时相当于(粗略理解) 我把自己的类的指针给了父类,然后父类拿到现在这个类的指针后,保存到prototypes[]中,还要利用这个指针创建一个实例化对象,才算真正的使用,clone()的作用就是返回一个实例化对象,上图描写的很清楚,return new LandSatImage, 那么上面的 prototypes[i]->clone() 其实就相当于 LandSatImage a = new LandSatImage();所以我们获得了一个实例化对象,就可以对他进行操作了,还要注意一个很重要的点,可以看到LandSatImage中有两个构造函数,那么作用是什么呢,因为prototypes[i]->clone()调用了LandSatImage中的clone()函数,然后return new LandSatImage;此时因为创建了一个LandSatImage对象,所以还会调用构造函数,那么如果只有第一个构造函数的话,就会套娃,无限addPrototype(this); 所以用第二个构造函数,加一个数字,这样就会避免调用第一个构造函数,所以其实是在clone()函数中应该写return new LandSatImage(1);(任何数字都行)这样就不会再次调用第一个构造函数了。
实现代码:
1 |
|
以上就是个人对两种模式一点理解。

